Keto Deep Dish Pizza

Published January 12, 2021 • Updated July 20, 2026
This post may contain affiliate links. See my disclosure policy.
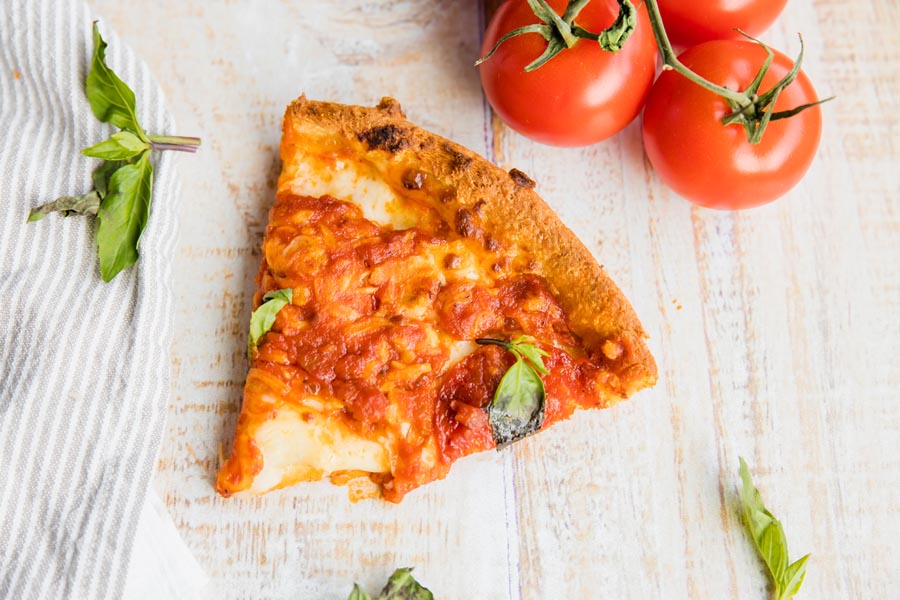
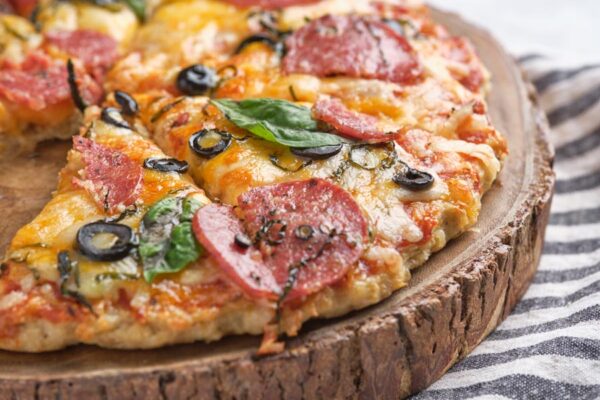
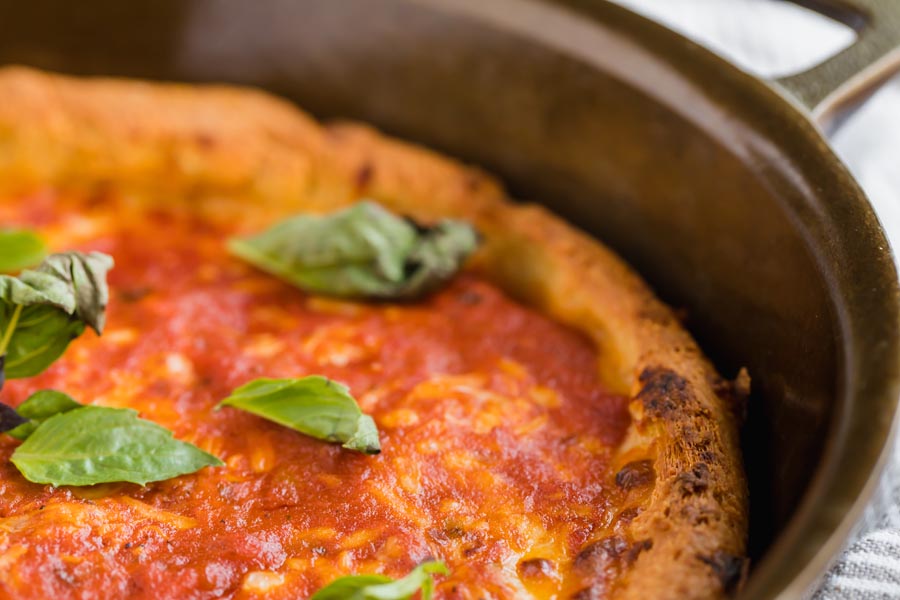
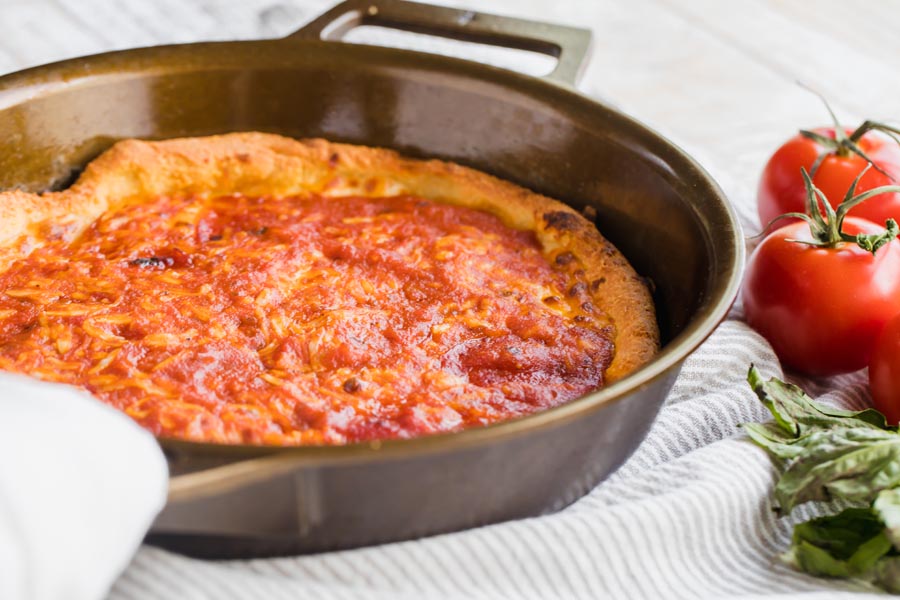
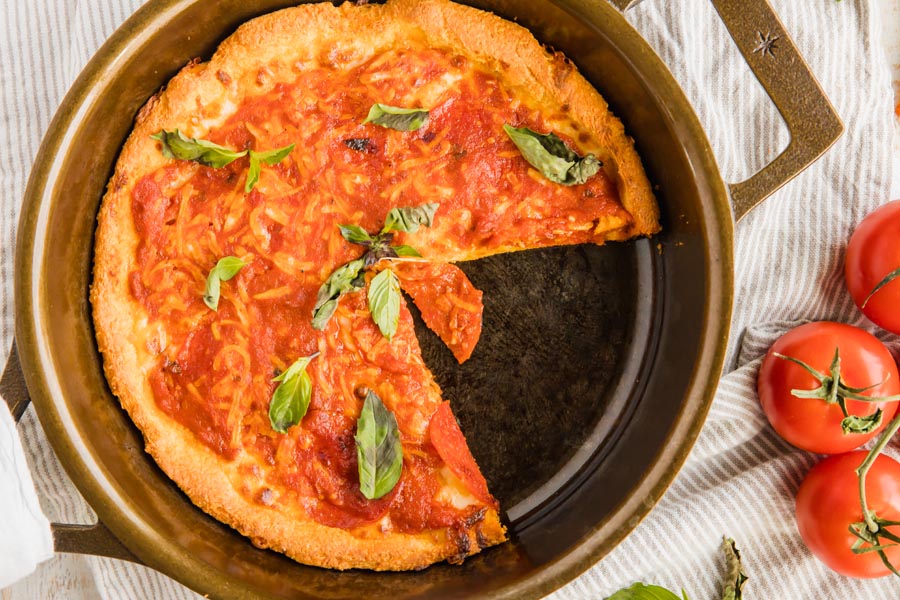
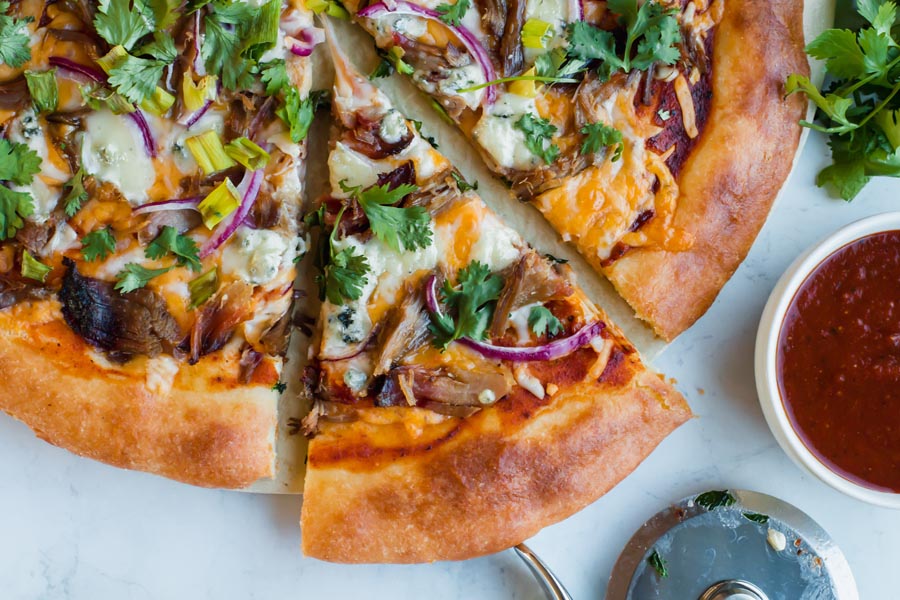
I make this keto deep dish pizza with lupin meal for a thick, cornmeal-like crust that holds up to layers of cheese, pepperoni, and sauce. Baked Chicago style in cast iron, no pre-baking required.
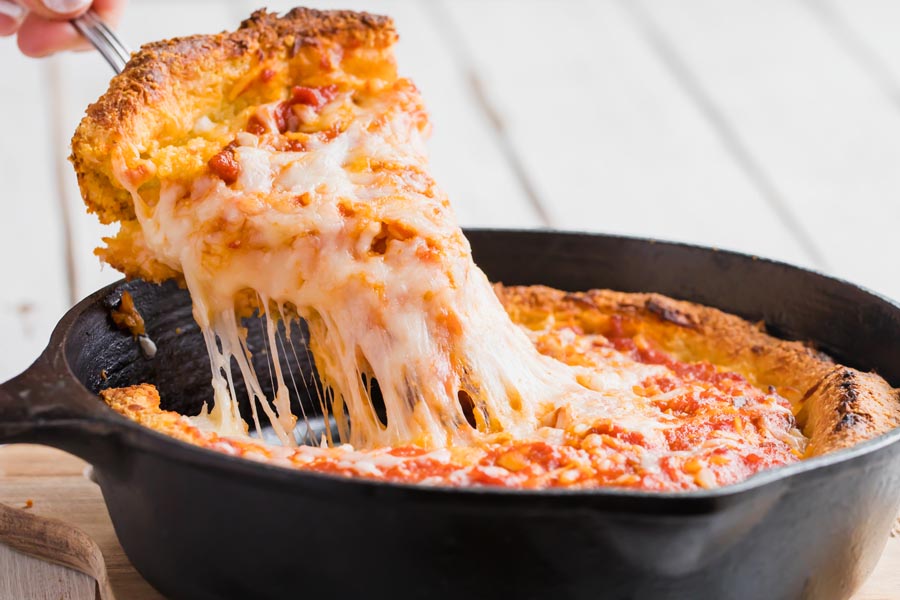
If you want a pizza that actually tastes like pizza on a low carb diet, this is it. I’ve made every crust out there (chicken crust, fathead, cauliflower, you name it) and this is the one my family requests on Friday nights. Not because it’s ‘healthy’ (they don’t care about that), but because to them it’s just pizza night. The crust is thick, the cheese is layered, and the whole thing comes together in a cast iron skillet that gives the bottom a golden, crispy crunch.
The secret is lupin meal. It gives the crust a cornmeal-like flavor and texture that’s almost identical to traditional Chicago style pizza. I tested both lupin flour and the meal grind, and the meal creates a denser, more authentic crust. That texture is what sets this recipe apart from everything else I’ve tried. Reader Scott summed it up perfectly after testing every version out there: ‘The lupin meal is the difference.’ He’s been making this as his go-to pizza since 2022.
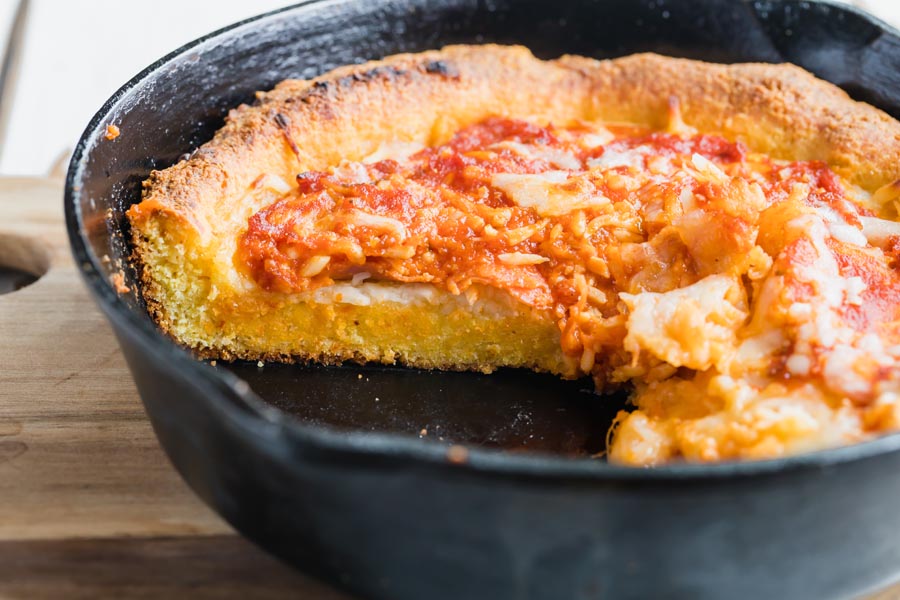
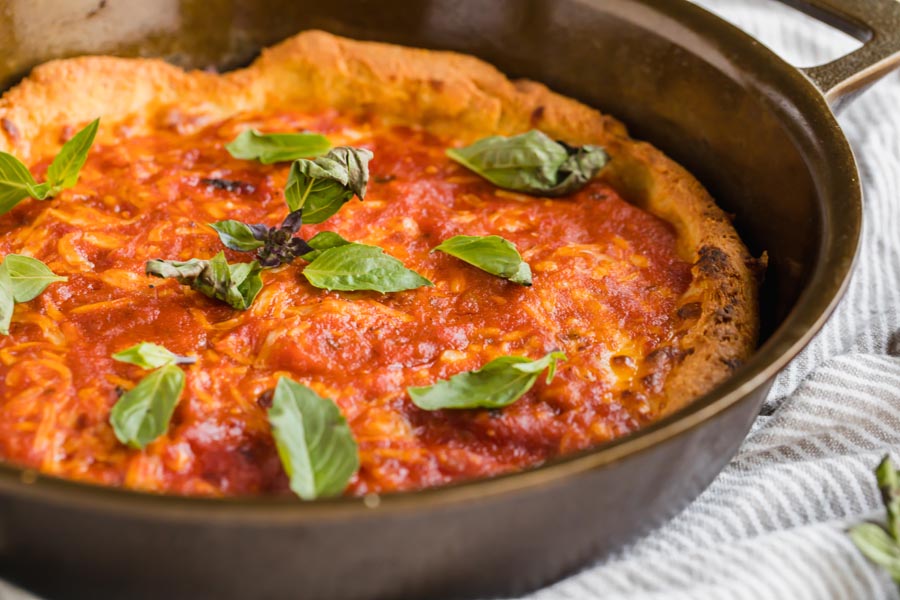
You don’t have to pre-bake the crust, either. Press the dough into a cast iron skillet, layer your toppings Chicago style (cheese first, then meat, then more cheese, sauce on top), and bake the whole thing at 350. Mine usually takes about 20 minutes, then I finish it under the broiler for 2-3 minutes until the edges go golden and bubbly. Most keto pizza recipes make you bake the crust first, add toppings, and bake again. This one goes straight from raw dough to fully loaded in one shot.
At 2.5g net carbs per slice, the macros are genuinely better than what you’ll find in most pizza recipes out there. And the crust holds up. I loaded mine with pepperoni, olives, banana peppers, and way too much mozzarella, and the center didn’t buckle once. Even when I doubled the recipe for a 10-inch skillet, it held together.
I make this for pizza night almost every week. Sometimes I stick with the classic pepperoni, sometimes I switch it up with sausage and mushrooms. The dough takes about five minutes in the food processor, and the whole pizza is done in under 30 minutes. It’s not a weekend project.
If you’re not in the mood for dough, my crustless pizza and keto pizza casserole skip the crust entirely. My chicken crust pizza makes a thick crust too, but it’s built on chicken, so it’s a completely different experience. When I want the real thing (thick crust, layers of cheese, that golden cast iron bottom), this is the recipe I come back to.
How to Make Cast Iron Pizza
I use a 6.5-inch or 8-inch cast iron skillet for this recipe. The smaller skillet gives you a thicker, puffier crust. The 8-inch makes slightly thinner slices but feeds more people. Either way, cast iron is what gives the bottom that golden, crispy layer you can’t get from a regular baking pan.
Spray the inside of the skillet generously with cooking spray before pressing the dough in. Push it up the sides about an inch. If the dough sticks to your hands, wet them slightly. I process everything in a food processor, but a stand mixer works too, and you can even knead by hand if you start with really hot, melted mozzarella. It just takes a few more minutes.
Explore hundreds of keto recipe videos with step-by-step instructions, tips, and tricks to make keto easy.
Keto Deep Dish Pizza Crust Ingredients
 1 1/2 cups shredded mozzarella cheese
 -
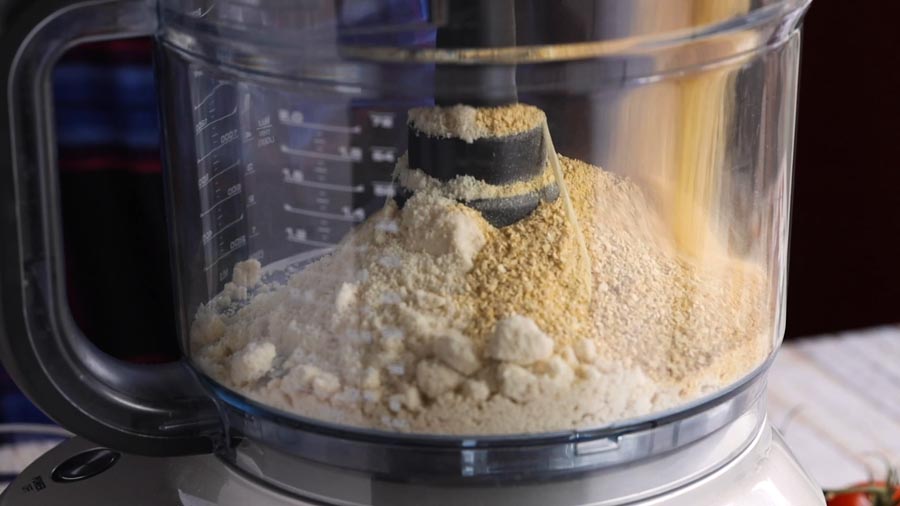
1/2 cup lupin meal
-
1/2 cup almond flour
-
1 egg
-
1 teaspoon baking powder
-
1/2 teaspoon salt
Toppings Ingredients
-
1/2 cup shredded mozzarella cheese
-
12 slices pepperoni
-
1/3 cup low-carb marinara sauce
Step by Step Instructions
Step by Step Instructions
Preheat
Preheat oven to 350 degrees.

Microwave the cheese
Place 1 1/2 cups mozzarella cheese in a microwave safe bowl. Microwave at 60 second intervals, stirring in between, until melted. You can also melt cheese in a non-stick skillet over medium heat on the stove top.

Food process it
Add melted cheese to a food processor. Add remaining ingredients for the pizza crust. Pulse until dough ball forms and ingredients are combined. If ingredients aren’t fully combined, you can knead the dough on the counter until combined or microwave the dough for 30 seconds and pulse again in the food processor.

Put the dough into a pan
Spray the inside of a 6.5 inch or 8 inch cast iron skillet, cake pan or square baking dish with cooking spray. Press pizza dough into the bottom of the skillet and up along the edges.

Halve the cheese
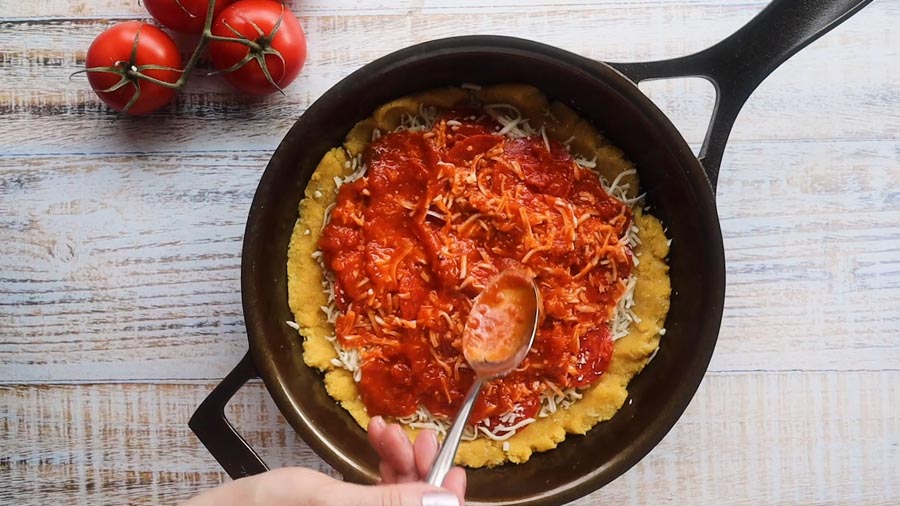
Add about half of remaining cheese on top of the dough.

Pepperoni time
Layer down pepperoni on top of the cheese.

Bake at 350
Sprinkle remaining cheese. Spread marinara sauce on top of the cheese. Bake at 350 degrees for 20 to 25 minutes. Finish the pizza under the broiler for 2-3 minutes.

Nutrition disclaimer
The nutrition information provided is an estimate and is for informational purposes only. I am a Doctor of Pharmacy (Pharm.D.); however, this content is not intended to be a substitute for professional medical advice, diagnosis, or treatment. Always consult your physician or other qualified health provider before making any lifestyle changes or beginning a new nutrition program.
Your Macros. Your Recipes. Calculated in 60 Seconds.
Get personalized keto macros and instantly see which recipes fit your targets. No more guessing what to eat.
Get My Macros + Recipes →Frequently Asked Questions
Is lupin flour the same as lupin meal, and which one should I buy?
I've tested both in this recipe and both produce a good crust. They come from the same bean, but the grind is different. Lupin meal is coarser, like cornmeal, and lupin flour is finer. I prefer the meal grind because it gives a denser, more cornmeal-like texture that's closer to traditional Chicago style pizza dough. The Amazon link in this recipe is for the meal, which is what I use every time.
Can I make this without a food processor?
I use a food processor because it's fast, but a stand mixer with the dough hook works too. You can also knead by hand. Start with really hot, freshly melted mozzarella so it incorporates more easily. By hand takes a few extra minutes of kneading, but you'll get there. Just make sure the dough is smooth and holds together before pressing it into the skillet.
What size cast iron skillet works best for this pizza?
I use a 6.5-inch or 8-inch cast iron skillet. The 6.5-inch gives you a thicker, puffier crust with taller edges. The 8-inch spreads the dough thinner and gives more surface area for toppings. Both work well. If you want to double the recipe, a 10-inch skillet or a standard cake pan handles that amount. I wouldn't go larger than 10 inches without doubling.
Can I freeze this pizza?
I slice the whole pizza, wrap each slice in plastic wrap, and freeze them in a zip-top bag. They keep for about 2 months. To reheat, I bake the frozen slices at 375 for 12-15 minutes directly on a sheet pan. The crust holds its texture surprisingly well from frozen. I wouldn't microwave them though, because the crust gets soft and loses that crispy bottom.
Does lupin flour have any allergy concerns?
Yes, and this is something I want people to know. Lupin is a legume closely related to peanuts and soybeans. If you have a peanut or soy allergy, talk to your doctor before trying lupin. I don't have any allergies myself, but I've had readers mention this, and when you're doing keto long-term, it's worth knowing what's in your ingredients. Better to check first.
How do I prevent the crust from sticking to the skillet?
I spray the inside of my cast iron generously with cooking spray before pressing the dough in. If your skillet is well-seasoned, that's usually enough. If it's newer or less seasoned, cut a circle of parchment paper for the bottom and spray on top of that. One reader had sticking issues and the parchment trick fixed it completely. I also make sure the dough is fully pressed into the corners with no air pockets underneath.
What toppings can I add to this pizza?
I usually go with pepperoni because it's classic and keeps things simple. But I've also loaded this up with sausage, mushrooms, bell peppers, olives, and banana peppers with no issues. The crust holds heavy toppings without buckling. Just watch the carbs on any sauces you add, and remember the layering order: cheese first, then toppings, then more cheese, then sauce on top.
Can I par-bake the crust for extra crispiness?
You don't need to, which is one of my favorite things about this recipe. But if you really want an extra-crispy bottom, you can bake the crust by itself at 350 for 8-10 minutes before adding toppings. I've done this a few times when I wanted maximum crunch. The edges get almost cracker-like. Just watch it closely so it doesn't over-brown before you add the toppings and put it back in.


I'm at six batches now. Lupin crust holds under a full layer of sauce, no sogginess, which I've never managed with fathead. Four stars because I'm still dialing in the pepperoni-to-sauce ratio.
Run the food processor a few extra seconds after the cheese melts in, the dough gets elastic and presses clean. Annie, I layered the sauce on top last and it sent me back to a deep dish place I went to once in my twenties. This one got the structure right.
I can't believe this is keto. Made it Saturday and the whole family went for seconds.
Somehow I'm in charge of pizza nights now.
I've been looking for a keto pizza I actually like, and a thick cast iron crust sounds way more satisfying than the thin cauliflower ones I've tried. My store doesn't carry lupin meal though, can I just use extra almond flour, or does lupin meal do something specific that almond flour can't?
Lupin meal gives the crust that cornmeal-like graininess and weight. Almond flour alone works (keep it at 1/2 cup) but the crust comes out softer and more bread-like, less of that deep dish density. Worth hunting down online. The texture difference is real.
Let it rest for five minutes after it comes out of the oven. The first time I cut in immediately and the sauce went everywhere. When I started keto I kept waiting for the moment where a substitution actually worked instead of just approximating what I remembered. Most recipes get you 70 percent of the way there and you fill in the rest with willpower. The lupin meal crust has real structure, the kind that holds up when you fold a slice. I'd never worked with it before and was nervous about the food processor step, but the dough came together in about thirty seconds. The 2.5 net carbs per serving weren't even what surprised me. It was that I didn't have to talk myself into liking it.
Something about the lupin meal crust having actual weight to it got me. Grew up going to a spot in Naperville where it came out in the cast iron still popping, and I'd written off that kind of pizza after going keto three years ago. This undid that.
Naperville knows deep dish. That weight from the lupin meal is what got me too when I first tested it. Almond flour crust is fine but it's airy, and airy doesn't feel like Chicago pizza. The cast iron is doing the real work, holding heat from the bottom the way those restaurant pans do. Three years is a long time to give something up.
the cheese smell pulled my son in from the backyard
That much mozzarella baking in cast iron does something to the whole house. I've had my husband appear from the garage mid-project over this one.
No par-bake and the crust still held. I've never had that happen with keto pizza. Lupin meal in cast iron apparently just works.
Cast iron from the bottom is what makes it work. Lupin meal firms up under heat in a way almond flour doesn't, so by the time the cheese melts the crust is already set.
Hosted pizza night last Friday instead of ordering delivery. One friend is a Chicago deep dish person who has a specific place she orders from every couple months. She picked up her slice, looked at the bottom, and said she didn't get how it held together that clean. That lupin meal crust actually does what a real crust does. Already texting people for a rematch next week.
A Chicago deep dish person flipping the slice to check the bottom is about the hardest test you can put this through. The lupin meal is what does it. Coarser grind means actual structure, not just something that holds together in the pan and falls apart when you pick it up. Cast iron helps seal the bottom. Already texting for a rematch means she's sold. I'll take that.
Made a double batch Sunday night and I've been pulling slices from the fridge all week. The cast iron keeps the crust from getting soggy even after three days, which I was genuinely not expecting from a keto pizza.
Fridge slice on day three from deep dish is one of the better meals in my week. Double batch or nothing.
Added a pinch of garlic powder and crushed fennel seed to the crust and it completely changed everything. The lupin meal already gives it that cornmeal texture, but now it actually tastes like a real deep dish place.
Fennel seed in the crust is such a good call. I've been adding it to the sauce but never thought to move it into the dough itself. Copying this.
That lupin crust has a real cornmeal bite to it, which surprised me. Four stars though because 1/3 cup of marinara barely registers under all that mozzarella, so I doubled it on round two and it made a noticeable difference.
Doubling the sauce works. I kept it at 1/3 cup to prevent a soggy bottom, but 1/2 holds up fine with a little extra bake time. The cornmeal bite from the lupin meal grind is exactly what I was going for.
Does the melted cheese need to cool before you add the egg, or can you throw everything in hot? Don't want scrambled eggs in my crust.
Give it about 60 seconds off the heat first. You want it still warm and stretchy but not steaming. I've rushed it before and the egg starts cooking on contact.
Never worked with lupin meal before and was fully prepared for this to be a disaster, but the crust came out thick and golden and I ate half the pan.
Half the pan is about right. Lupin meal looks like beige sawdust before it goes in but that cast iron does something to it.