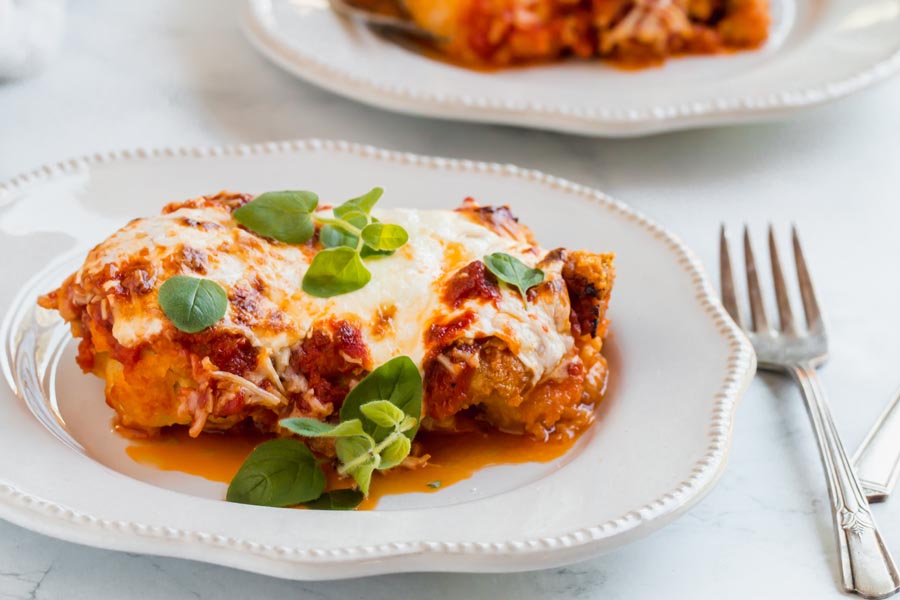
Keto Chicken Crust Pizza

Published November 10, 2019 • Updated July 20, 2026
This post may contain affiliate links. See my disclosure policy.
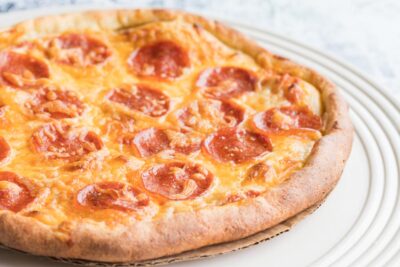
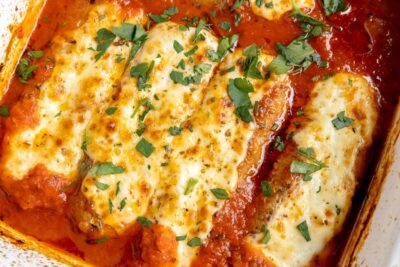
I know, a pizza crust made of chicken sounds strange. But hear me out: 4 ingredients, 1.8g net carbs, and 27g of protein per serving (that's more than four eggs or a standard protein shake). My family actually asks for this on Friday nights. No nut flours, no coconut flour. Just ground chicken, egg, and cheese pressed thin and baked crispy at 450. If you prefer almond flour crusts, try our Fat Head pizza, or grab a 1-minute pizza bowl for an even faster low-carb pizza night.
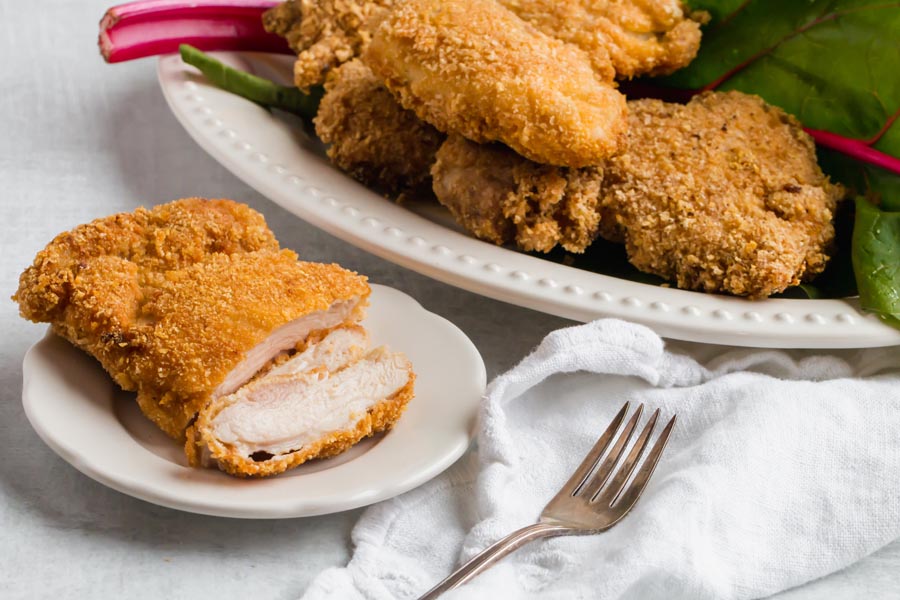
Chicken crust pizza doesn’t taste like bread dough. If that’s what you’re expecting, this isn’t your recipe. But if you want a crispy, savory base that holds your toppings without falling apart and has almost zero carbs? If you’ve tried chicken crust before and it turned out soggy, this is different. The parmesan acts as a drying agent, and the pre-bake step locks in structure.
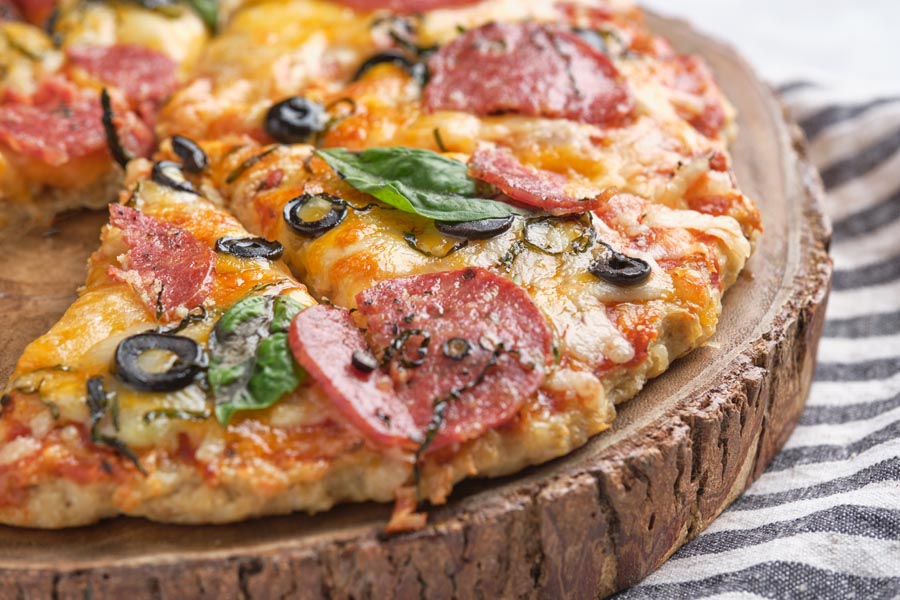
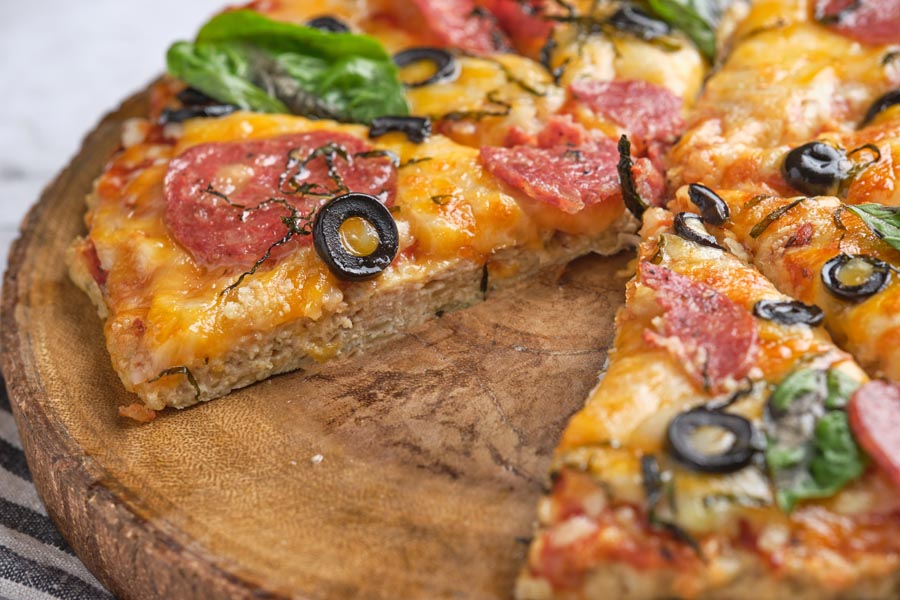
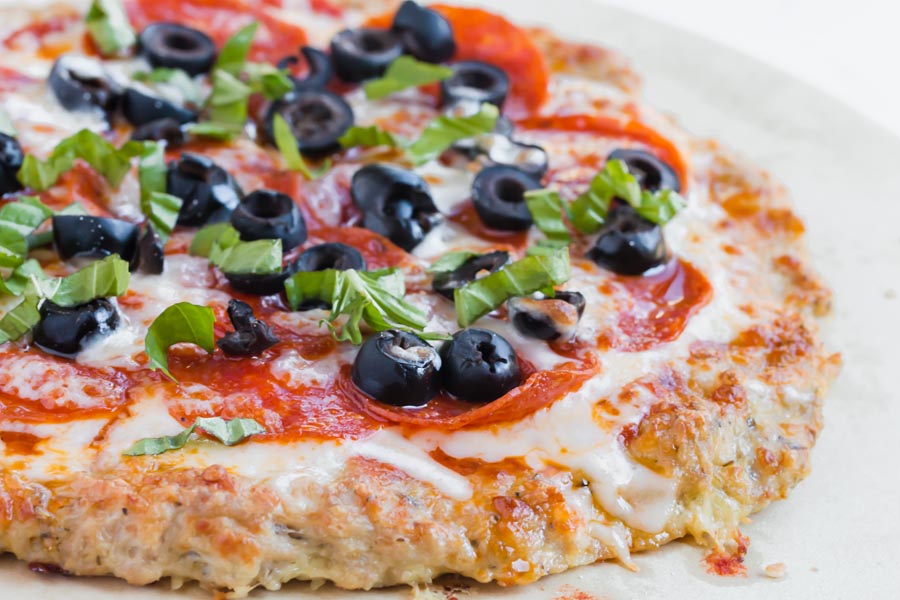
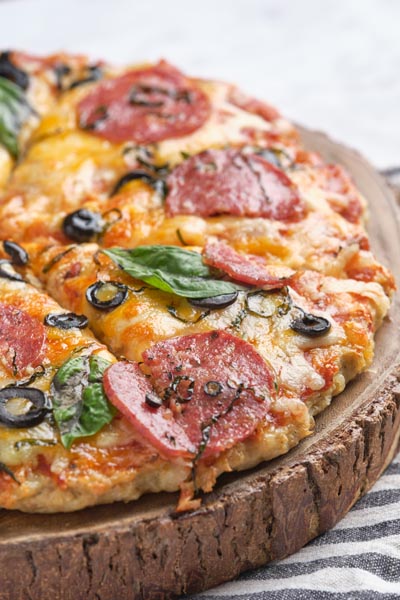
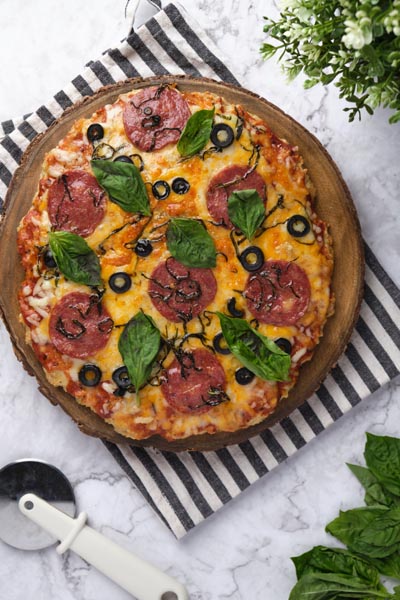
I’ve been making this since 2018, and it’s the recipe my kids actually request. Not because it’s “healthy” (they don’t care about that), but because to them it’s just pizza night. The edges crisp up golden and almost crackle when you bite in, while the center stays firm enough to hold toppings without any flop. What I’ve figured out is pressing the crust into an even layer, about 1/2 inch thick, and using parchment paper so it doesn’t stick. At 450 degrees, the bottom gets that deep golden color you want. You’ll smell the parmesan getting toasty around minute 12. Mine usually takes 16-18 minutes, not the full 20.
I tested this recipe at three different oven temperatures (400, 425, and 450) before settling on 450. Below that, the crust never developed that golden-brown crispiness on the edges. It stayed pale and soft. I also experimented with thickness. An even 1/2 inch layer is the sweet spot. When I left the middle mounded thicker than the edges, the crust turned out soggy in the center no matter how long I baked it. An even press lets moisture escape while the parmesan crisps up.
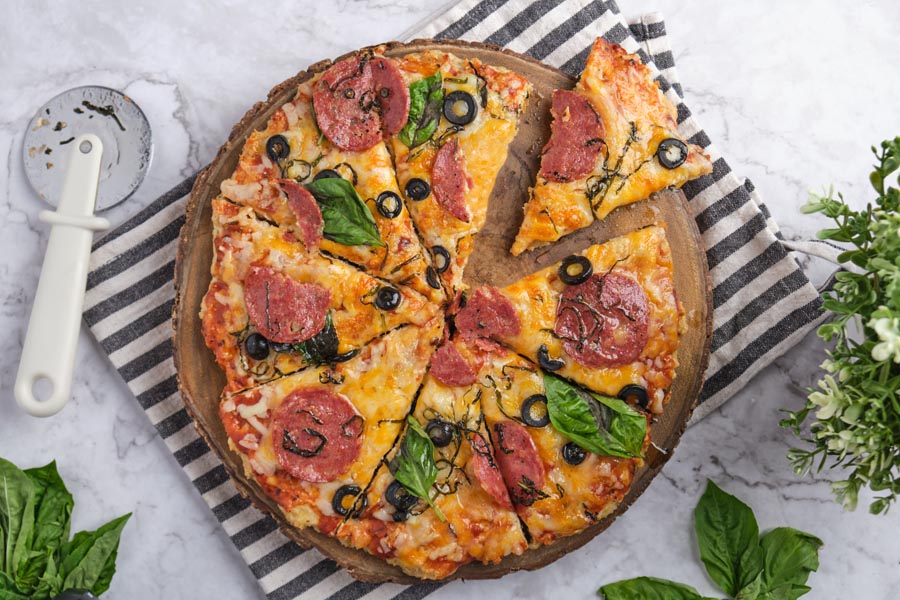
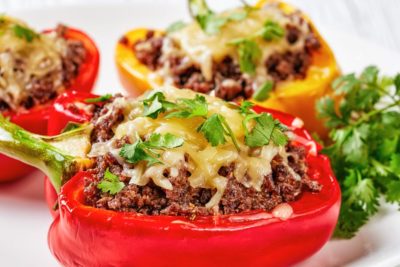
This is also perfect if you’re eating carnivore or ketovore (no plant-based ingredients). Four ingredients, nothing processed, and 27g of protein per serving (that’s more than four eggs or a standard protein shake). One of my readers mixes in a pound of Italian sausage with the ground chicken and doubles the cheese, pushing it even higher. Her whole family loves it, and I make it that way sometimes too when I want extra flavor. If you love chicken and Italian flavors, you’ll also love keto chicken parmesan.
One more thing: leftovers reheat better than any keto crust I’ve tried. Skip the microwave (it makes everything soggy). Pop slices in a toaster oven at 375 for 5-7 minutes, and the crust crisps right back up. I’ve meal-prepped this on Sundays and eaten it all week. Day 3 is just as good as Day 1. Serve alongside keto deep dish pizza for the ultimate pizza spread.
I know the concept sounds weird. One commenter told me she planned a “backup meal” of regular food in case her grandkids wouldn’t eat it. The backup stayed in the freezer. If you’re on the fence, start with half the recipe and see what you think. The comments are full of former skeptics.
WHAT PEOPLE ARE SAYING ABOUT THIS PIZZA & HELPFUL TIPS
“I’ve made chicken crust pizza many times using either canned chicken or ground chicken. I like using the ground chicken better but I roll it out thinner than you did in the video. It makes the crust crispier which I like. My whole family likes it!“
➥ from YouTube subscriber @megananimous
“Oh MY! I first KETO recipe and this was amazing! Tender. Tasty. Absolutely delicious. I’m thinking leftovers for breakfast with an egg.”
➥ from YouTube subscriber @marlataggart3996
“Made this but used 1lb ground chicken and 1lb of Italian sausage and just doubled the cheese, seasoning and egg. Me and my husband love it. Helped curve our pizza craving so much!“
➥ from YouTube subscriber @Heatherrr1234
How to make chicken pizza crust
The pressing and baking technique
Getting this right comes down to how you press and when you pull it. I use wet hands (keeps the chicken from sticking to your fingers) and press from the center outward on parchment paper. Aim for an even 1/2 inch thickness from center to edge. The mixture puffs slightly as it bakes, so keep the middle from mounding thicker than the rim.
Pre-bake at 450 for 16-18 minutes before adding any toppings. You’ll smell the parmesan getting toasty around minute 12, and that’s a good sign, but don’t pull it yet. Wait until the edges go deep golden and slightly crackled. The parmesan isn’t just for flavor here. It acts as a drying agent, pulling moisture out of the chicken as it bakes. That’s why the crust firms up instead of staying wet. One of my readers uses a silicone baking mat instead of parchment and says it peels off even cleaner. I tried it after reading her comment, and she’s right. Either works, just skip foil (it sticks).
Explore hundreds of keto recipe videos with step-by-step instructions, tips, and tricks to make keto easy.
Ingredients
 1 pound ground chicken
 -
1 egg
-
1/2 cup shredded mozzarella cheese
-
1/4 cup grated parmesan cheese
-
1 teaspoon salt
-
1 teaspoon italian seasoning (optional)
-
1/2 teaspoon garlic powder (optional)
Step by Step Instructions
Step by Step Instructions
Preheat oven
Preheat oven to 450 degrees Fahrenheit.
Mix ingredients
Combine all ingredients in a medium bowl and mix until combined. Form chicken mixture into a ball.

- 1 pound ground chicken
- 1 egg
- 1/2 cup shredded mozzarella cheese
- 1/4 cup grated parmesan cheese
- 1 teaspoon salt
- 1 teaspoon Italian seasoning (optional)
- 1/2 teaspoon garlic powder (optional)
Press into pizza crust shape
Place a piece of parchment paper on a baking tray, pizza pan or pizza stone. Press chicken mixture out onto the parchment paper to form a pizza crust shape that is about 1/2 inch thick.

Bake it
Bake in a 450 degree oven for 15 minutes.

Top it
Add your favorite pizza toppings. Broil on high to melt the cheese on the toppings until bubbly.

Nutrition disclaimer
The nutrition information provided is an estimate and is for informational purposes only. I am a Doctor of Pharmacy (Pharm.D.); however, this content is not intended to be a substitute for professional medical advice, diagnosis, or treatment. Always consult your physician or other qualified health provider before making any lifestyle changes or beginning a new nutrition program.
Your Macros. Your Recipes. Calculated in 60 Seconds.
Get personalized keto macros and instantly see which recipes fit your targets. No more guessing what to eat.
Get My Macros + Recipes →Frequently Asked Questions
How do I reheat this pizza?
I reheat mine in a toaster oven at 375 for 5-7 minutes, and the crust crisps right back up. Skip the microwave (makes it soggy every time). A regular oven or air fryer at 350 for 4-5 minutes works too. For extra crispiness, I set slices on a wire rack instead of flat on a baking sheet so air hits the bottom. Leftovers keep well in the fridge for 3-5 days.
How many carbs are in this crust?
My recipe comes out to 1.8g net carbs per serving (2g total, 0.2g fiber). Compare that to regular pizza dough at 30-40g per slice, or even cauliflower crust at 3-5g. I haven't found a lower-carb pizza base. Keep in mind toppings add carbs: marinara runs about 2-3g per serving, and veggies vary (mushrooms, peppers, onions add 1-3g each). I stick with meat and cheese toppings to keep the whole slice under 5g total.
How do I keep the crust from getting soggy?
Three things I've learned from making this dozens of times: (1) Press it to an even 1/2 inch. A mounded center traps moisture. (2) Pre-bake the full 16-18 minutes until the edges go golden brown. Don't rush this step. (3) Use parchment paper underneath so steam escapes. The parmesan does a lot of the work here, pulling moisture out as it bakes. After adding toppings, I broil on high just until the cheese bubbles, then let it cool on a wire rack for 2-3 minutes before slicing. That firms up the bottom.
Does it actually taste like chicken?
Honest answer: slightly, but not in a bad way. I've made this hundreds of times, and what I taste most is the parmesan and Italian seasoning, giving you a savory, cheesy base with toasty notes. It doesn't taste like plain grilled chicken breast. Once sauce, cheese, and toppings go on, the pizza flavors take over completely. My kids request this on Friday nights and have never once called it "chicken food." If you're expecting Domino's, this isn't that. But if you want a crispy, high-protein base that holds toppings, this delivers.
Is this the same as a chicken mince pizza base?
Yes. Chicken mince pizza base is just what a lot of my readers in the UK and Australia call this (mince means ground chicken, base means the crust). It's the same recipe either way. I press the ground chicken thin into a base, pre-bake it at 450 until the edges go golden, then load on the toppings. One reader in England told me she presses her base even thinner for extra crunch, and I've started doing the same when I want a crispier bottom.
Can I use canned chicken or rotisserie chicken?
I prefer ground chicken because it presses flat and uniform, which gives me the crispiest result. Canned chicken works well if you drain and squeeze out all the liquid. One reader told me she presses it even thinner than I do to compensate for the extra moisture, and her family loves it that way. Rotisserie chicken is the trickiest because the longer fibers don't bind as tightly, making the crust more fragile. If that's what you have, pulse it in a food processor first and add an extra tablespoon of cheese.
Can I freeze the crusts?
I freeze these all the time, two ways. For unbaked crusts: shape and pre-bake for 12-14 minutes (not the full 18), cool completely, then freeze flat with parchment between layers. Good for 3 months. Add toppings while still frozen and bake at 450 for 15-18 minutes. For leftover cooked pizza: wrap slices in plastic wrap, then foil. Freeze up to 2 months. Reheat from frozen in a toaster oven at 375 for 8-10 minutes. The texture holds better than cauliflower crust after freezing, which is why I always keep a stash.
Can I make this in an air fryer?
Yes, and I actually prefer it when I'm cooking for one or two people. Make smaller rounds (6-8 inches) so they fit the basket. Air fry the crust at 375 for 12-15 minutes, checking at 10. Add toppings, then air fry another 4-5 minutes until the cheese bubbles. The circulating air makes the crust crispier than the oven method. Use parchment in the basket but trim it so it doesn't block airflow.
Can I use a silicone baking mat instead of parchment paper?
One of my readers (Amanda) uses a silicone mat and swears the crust peels off even cleaner than parchment. I tried it after reading her comment, and she's right. The silicone gives a slightly crispier bottom because it conducts heat differently than paper. The only downside is you can't trim silicone to size like parchment. Either option works. I'd avoid foil though (the crust sticks even with oil).
What other keto pizza options do you make besides chicken crust?
This chicken crust is the one I make most because it packs 27g of protein per serving and holds toppings without flopping, but I keep a few other keto pizza bases in rotation depending on the night. When I want an almond-flour dough that eats closest to real pizza, I make my fat head keto pizza. For a fast single-serving fix, I grab a 1-minute pizza bowl, and when I want to skip the crust entirely I make crustless pizza. The chicken base still wins on protein, which is why it's my Friday-night default.


Annie, you brought pizza night back when I'd genuinely stopped expecting it. Fourteen months keto and I'd accepted the crust problem was basically unsolvable. The protein in the chicken at 450 actually grips the toppings differently than any flour-based sub I've tried (the edges firm up, not just brown), and 27g per serving meant I wasn't still hunting for something after. One thing though: my first batch needed more salt than the recipe calls for, at least for my palate, so taste the mix before pressing. Otherwise it held up fine.
Yeah, the edge thing. It's the protein setting, that's what makes it hold toppings instead of absorbing them. Parmesan saltiness varies by brand, so tasting first is the move.
Not sure how to explain 'it's ground chicken pressed flat and baked' to people who just want Friday pizza, so I just set it out without saying anything. Two friends thought it was a deli crust. Four stars because I still need to figure out the thin-and-even press, but I'm doing this again.
Deli crust. That's the best reaction I've heard. For the even press, lay a sheet of parchment on top and push down with a pie dish for consistent thickness.
Never thought to use a pie dish for even pressure. Trying that next Friday.
Fat head is the default keto pizza comparison, and almond flour always softens once toppings sit. Made this on a weeknight. Crust stayed crisp through leftovers. 27g protein, but the structure is what sold me.
Denise, ground chicken doesn't absorb moisture from the sauce the same way, that's exactly where this one separates. Fathead at 375, day-two reheats... still softening in the center.
Would double the garlic next time but otherwise obsessed.
I've pushed mine to a full teaspoon, Rebecca. Makes a difference, especially if you're going light on toppings.
Turns out pressing chicken and parmesan thin and baking it at 450 produces something that looks more convincing than it has any right to. Brought it to a dinner party last month without explaining. A guest spent a full minute with her fork trying to figure out what flour I used. When I told her it was ground chicken, she stopped mid-bite. Then finished the slice anyway, best reaction you can get from a skeptic.
A full minute with the fork is so accurate. I've seen that face, Beth. They figure it out right as the last bite disappears.
Let it cool a minute before slicing or the whole thing falls apart. My daughter called it 'fancy meat pizza' and that was that. Solid weeknight dinner. Would go heavier on the garlic next time though.
Was fully prepared for disaster (ground chicken as pizza crust, what?) but 15 minutes at 450 and it actually holds a slice without flopping. Still kind of in shock. Four stars only because I need to make it two more times before I fully believe it.
The disbelief phase is real. Two more makes and you'll just start doing it on autopilot. Press it to 1/4 inch max and the edges go almost crackery.
Friday night pizza was a whole ritual in my house growing up, homemade dough, my mom's sauce from a jar she swore was better than anything from scratch. I genuinely thought I had left that behind when I went keto three years ago. Made this last Friday and I don't know, pressing that chicken mixture thin on the parchment and watching it come out of the oven golden and crisp around the edges, it felt like the same thing somehow. The crust has this satisfying bite (nothing like cauliflower, which always felt like a compromise to me) and with Rao's and some fresh basil from the garden it was actually Friday night pizza again. I pulled it right at 15 minutes when the parmesan edges started to brown, which is the sweet spot. Four stars only because I pressed mine too thin in one spot the first time and the center came out fragile, but once I kept the thickness even at around 1/4 inch it held everything perfectly.
Cauliflower always felt like a food-math compromise to me too, swap one texture for something adjacent and call it pizza. Parmesan edges going golden is the right cue, mine lands at 15 minutes almost every time.
Growing up, my mom made homemade pizza every Friday. The whole production, flour everywhere, sauce from scratch. I've been keto for two years and quietly grieved that ritual until I found this. The chicken crust bakes up so golden and firm that when I pulled it out at 15 minutes, something just clicked back into place. Making it a new Friday thing.
Friday night pizza has its own weight. My family asks for this specifically on Fridays now, which surprised me at first because it's chicken. But ritual is ritual. The 15-minute mark is when it happens for me too, edges going golden and the kitchen smelling right. Glad you're back to Fridays.
Used half ground chicken, half mild Italian sausage and the edges got way crispier. More fat in the mix I think. Not as protein-forward but worth it.
The fat rendering is exactly it. I do this with pork breakfast sausage sometimes and get the same thing. Crisper edges, slightly richer flavor.
If you pat the ground chicken dry before mixing, the crust holds its shape way better when you pull it from the oven. Found that out the hard way on batch two. Worth the extra 30 seconds.
Yeah, moisture is the whole battle with this one. I should have put that step in the recipe.
Wet your hands first. Keeps the chicken from sticking and you can actually press it to 1/4 inch without fighting it. Wish I'd known that before batch one.
This works. The chicken mix grabs onto dry hands fast, and wet hands are what finally get you to that 1/4 inch.
First time making a chicken crust and I was nervous the whole way through. It held together and got that golden edge though! Do you think parchment is necessary or would a lightly oiled pan work?
Stick with parchment. The crust is really sticky right out of the oven and I've torn it trying to get it off an oiled pan. Let it cool a couple minutes and it peels clean.
Six batches in and pressing it genuinely thin (like, commit to that 1/4 inch) is what finally got me all-over crisp instead of just the edges.
Six batches sounds about right. I still catch myself wanting to stop early because thin feels wrong when you're pressing it out.
Swapped in some provolone for half the mozzarella because it's what I had, and it gives the cheese a different pull when you bite in. More stretch than melt, which I liked. Pressed mine to 1/4 inch and it came out crispy all the way through. First time I left it thicker and the center stayed soft, so if you're new to this, go thinner than feels right.
Provolone stretches so differently than mozz. Never tried splitting it in the crust. Now I kind of want to.