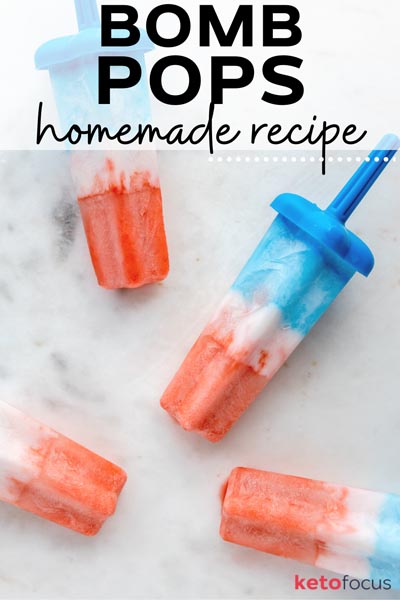
Bomb Pops

Published May 20, 2022 • Updated July 7, 2026
This post may contain affiliate links. See my disclosure policy.
I make these sugar free popsicles every summer, and my kids line up for them. Three layers of cherry, lime, and blue raspberry with zero sugar and zero guilt trips about ingredients.
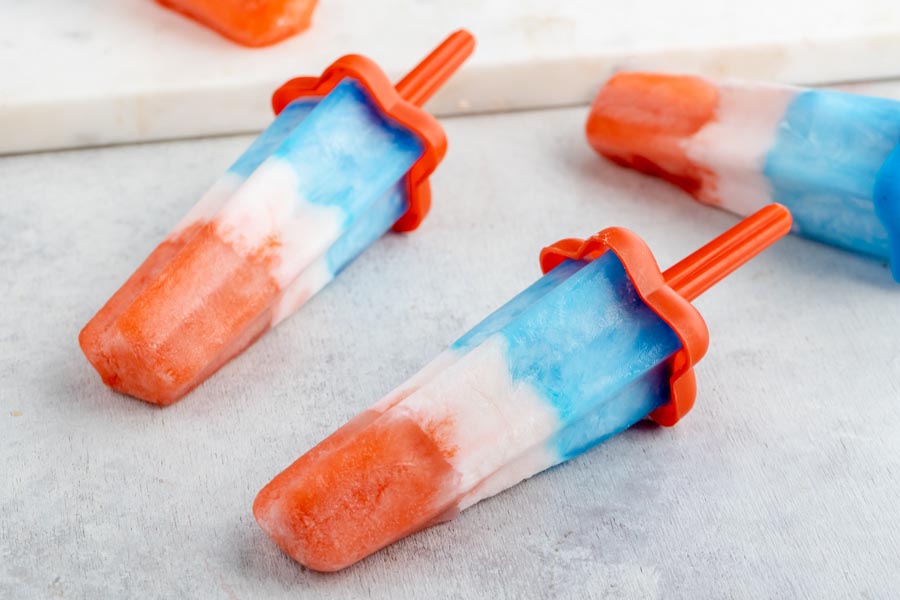
The Bomb Pop (or Rocket Pop, depending on where you grew up) is the popsicle I always grabbed off the ice cream truck as a kid. That red, white, and blue layered frozen treat just screams summer. I still love them, but the store-bought ones are packed with sugar and high fructose corn syrup, so I started making my own keto version at home.
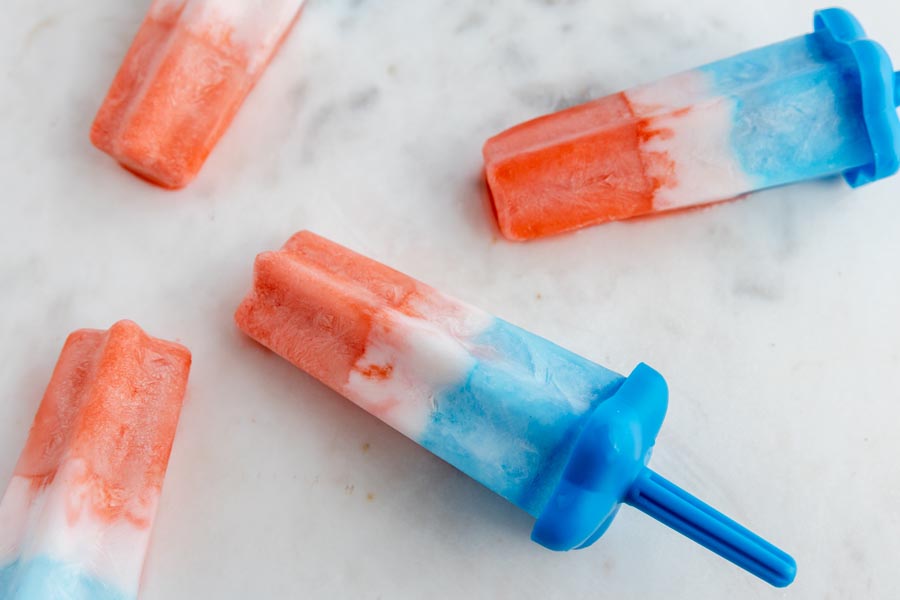
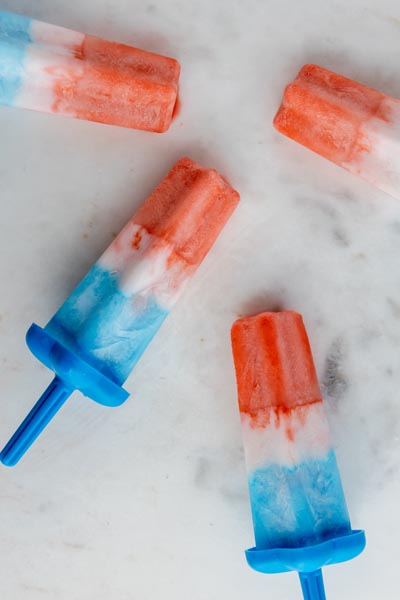
I’ve made these dozens of times now, and the process is really straightforward. About 15 minutes of active work, then the freezer does the rest. You build three layers (cherry red on the bottom, creamy white lime in the middle, blue raspberry on top) and freeze each one before adding the next. The waiting is the hardest part.
What I love about this version is that the flavors actually taste like the original. The cherry layer has real cherry extract, the lime layer gets a little heavy cream for that creamy white stripe, and the blue raspberry layer is tangy and bright. My kids cannot tell the difference between these and the ones from the store. I think these taste better because the flavors are more concentrated.
One thing I learned after making these with different sweeteners: erythritol-based pops freeze harder than you’d expect. If you use Swerve or Lakanto, pull them from the freezer about 5 minutes before serving so they’re not rock-hard on your teeth. Allulose gives a softer freeze straight from the freezer, but I still prefer powdered erythritol blends for the clean sweetness.
If you’re looking for more sugar free frozen treats this summer, I have a whole collection. My strawberry ice cream is the fruit lover’s pick. The chocolate chip yogurt popsicles are great for an afternoon snack. And if you want something creamier, try my strawberry sorbet or mint chocolate ice cream bars. I keep at least two varieties in my freezer at all times from June through September.
One thing I learned from reader comments: the popsicle stick situation trips people up. If your mold has long sticks that go through all three layers, you need to insert the stick after the first layer is semi-frozen (about 30-45 minutes), pull it out once the indent holds, then reinsert after the final layer. I cover this more in the FAQs below because I got a lot of questions about it.
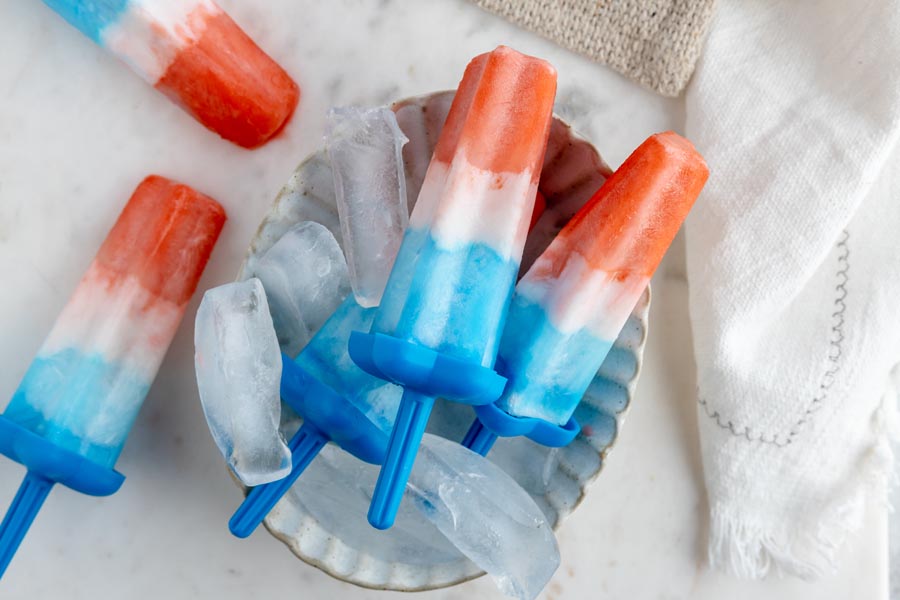
These are also great for the 4th of July, Memorial Day, or any backyard hangout where you want something cold and sweet without the sugar crash. I’ve brought them to neighborhood cookouts and people always ask if they’re “real” popsicles. They are. Just without the junk.
How to make homemade rocket pops
Explore hundreds of keto recipe videos with step-by-step instructions, tips, and tricks to make keto easy.
Ingredients
 3 1/4 cups water
 -
1 cup powdered sugar free sweetener
-
1/4 teaspoon cherry flavoring extract
-
1/4 cup heavy whipping cream or coconut milk
-
1/4 teaspoon lime flavoring extract
-
1/4 teaspoon blue raspberry flavoring extract
-
food coloring (red & blue)
-
popsicle mold
Step by Step Instructions
Step by Step Instructions
Make popsicle base
Add 3 1/4 cups water to a large measuring cup. Pour in powdered sugar free sweetener and mix until dissolved.

- Water
- Powdered sugar free sweetener
Red layer
Pour 1 1/4 cups of ‘sugar’ water into a smaller measuring cup. Add cherry flavor extract and red food coloring. Mix until combined. Pour into popsicle molds filling 1/3 of the way full. Freeze for 2 hours or until hardened.

- Cherry flavoring
- Red food coloring
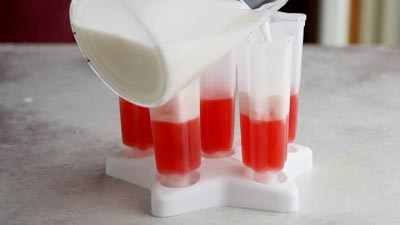
White layer
Pour 3/4 cups of the sweetened water to a measuring cup. Add heavy cream or coconut milk and lime flavoring. Stir until combined. Pour into the popsicle molds over the frozen red layer. Fill until 2/3 from the top. Freeze for 2 hours or until hardened.
- Heavy cream
- Lime flavoring
Blue layer
Pour 1 1/4 cups of ‘sugar’ water into a smaller measuring cup. Add blue raspberry flavoring and blue food coloring. Mix until combined. Pour into popsicle molds on top of the white layer, filling to the top. Insert popsicle sticks. Freeze for 4 hours or until hardened.

- Blue raspberry flavoring
- Blue food coloring
Nutrition disclaimer
The nutrition information provided is an estimate and is for informational purposes only. I am a Doctor of Pharmacy (Pharm.D.); however, this content is not intended to be a substitute for professional medical advice, diagnosis, or treatment. Always consult your physician or other qualified health provider before making any lifestyle changes or beginning a new nutrition program.
Your Macros. Your Recipes. Calculated in 60 Seconds.
Get personalized keto macros and instantly see which recipes fit your targets. No more guessing what to eat.
Get My Macros + Recipes →Frequently Asked Questions
What is a bomb pop?
I grew up calling these Bomb Pops, but some people know them as Rocket Pops. They're the classic red, white, and blue layered popsicles from the 1950s, with cherry, lime, and blue raspberry flavors. My version swaps out all the sugar for a keto-friendly sweetener, but the flavor layers are the same.
What flavors are in a bomb pop?
The classic three are cherry (red), lime (white), and blue raspberry (blue). I stick with these for the authentic taste. I use concentrated flavor extracts from LorAnn, and they nail the original flavor. If you want something different, I've also tried strawberry, coconut, and watermelon layers.
Does the sweetener make these freeze rock hard?
It depends on which one you use. I've tested this across multiple sweeteners, and erythritol-based blends like Swerve and Lakanto freeze noticeably harder than what you're used to with regular popsicles. I pull mine from the freezer about 5 minutes before eating so they're not brutal on your teeth. Allulose stays softer because it lowers the freezing point, so if texture is a priority, that's the swap I'd make. I still prefer powdered erythritol blends for the cleaner sweetness, but both work.
Why is my blue raspberry layer pale or weak-flavored?
I had this issue on my first batch too. The 1/4 teaspoon in the recipe is a starting point, but blue raspberry extract varies a lot by brand. I use LorAnn concentrated oils, and I've gone up to a full teaspoon when the color and flavor felt flat. If you're using a non-concentrated extract, start at 1/2 teaspoon and work up. More food coloring helps the visual, but the flavor has to come from the extract itself.
Can I use real fruit instead of flavor extracts?
I've tried it. Pureed strawberries work for the red layer, but the color is duller and the flavor is milder than extract. For a layered popsicle like this, I prefer extracts because the color stays vivid and the flavor is more concentrated, which is what makes it taste like the original. Real fruit also adds natural sugars and changes the carb count. If you want a fruit-forward frozen treat, I'd go with a single-flavor popsicle instead of trying to layer it.
How long should I freeze between layers for clean lines?
I've tested this and so have my readers. 45 minutes between layers gives you clean, distinct lines. 20 minutes gives you a muddy blur where the colors bleed together. I aim for 30-45 minutes minimum per layer. The surface should feel firm when you touch it, not slushy. If you rush this step, you'll see it in the finished product.
Can I make these dairy-free or vegan?
I've made the white layer with coconut cream instead of heavy cream, and it works great. The coconut flavor is subtle, and the layer still freezes up creamy and opaque. I've noticed coconut milk might actually set a little better than cream after a few side-by-side batches. For a fully vegan version, that's the only swap you need since the red and blue layers are already dairy-free.
How do I insert popsicle sticks through frozen layers?
I got a lot of questions about this from readers. Here's what I do: freeze the first red layer for about 30-45 minutes until it's semi-set (not rock hard), then push the stick in to make an indent. Pull the stick back out and let the layer freeze completely. Pour the next layer, repeat the stick process, and keep going. For the final blue layer, push the stick in for good. This way the stick goes through all three layers without cracking anything.
Are these bomb pop popsicles keto-friendly?
The store-bought version runs around 40 grams of sugar per pop, so those are off the table on keto. Mine come in at 0.1g net carbs and about 24 calories each because I swap every bit of sugar for a powdered erythritol blend. I've been making this sugar free version for years, and it tastes like the cherry, lime, and blue raspberry pop I grew up chasing down the ice cream truck for, without the sugar crash.


Confession: adults beat the kids to them at my nephew's birthday
Pack these in a cooler and serve straight from it. Brought them to a birthday party and two minutes on a table was enough for the stripes to blur. People know the shape on sight, so the look matters. Cherry and blue taste the same either way.
Cooler only, yeah. The stripes are most of the appeal and they go fast once the heat hits. I'd push back on cherry and blue tasting the same though, the LorAnn cherry is pretty distinct, it's the one that makes it taste like the truck.
That explains it. I've been using McCormick. Will grab LorAnn before I make these again.
Had to stir the sweetener mixture a full two minutes before it cleared, which I wasn't expecting from a cold-water mix. The blue food coloring went lavender on me until I added a second drop, so go a drop at a time if you actually want it to read blue. Lost one to the mold on the first pull. Annie, is warm water for a few seconds the right way to release them, or is there a better trick?
Warm water works. Not hot, just lukewarm. Run it over the outside of the mold for 10 seconds, then twist gently instead of pulling straight up, and they usually slide out clean. That first pull I always go too fast.
Poured the lime layer half-expecting it to get buried, and it does. Cherry and blue raspberry both hit strong, and lime ends up as background flavor rather than its own thing. I kept second-guessing my measurement until I reread it: a quarter teaspoon against those two. To get all three to actually land, push lime extract to a third of a teaspoon and go heavier on the green food coloring than the recipe suggests, because the visual really does help. Three-stripe finish is worth getting right, and at 0.1g net carbs and 24 calories a pop I'm just going to keep making these until it clicks. Four stars, easily fixable.
Lime was never going to win against cherry and blue raspberry at equal parts. A third of a teaspoon is what I'd do, Kendra, and heavy on the green coloring or the stripe looks like an afterthought.
Genuinely thought this category of food was just gone for me. Bomb pops specifically, the kind I grew up chasing down the ice cream truck for, were this whole summer ritual I'd mentally filed under 'not anymore.' Zero point one net carbs made me stop scrolling and actually read the recipe. The cherry and lime layers taste like the real thing. I've already made three batches and honestly still kind of stunned that this is allowed.
Three batches in one summer is the goal. The LorAnn cherry is what makes it taste like the truck, not like cough syrup flavoring.
The cream layer is what other versions skip.
It's what makes it taste like the real thing. Most keto versions are just sweetened water with flavoring, you can tell immediately. The cream gives a softer texture that breaks up the icy layers, closer to what I remember. Tried it without once just to see. Flatter flavor, wrong mouthfeel.
First time making popsicles from scratch and I had no idea how satisfying the layering process would be. Waiting for each layer to set felt almost meditative on a hot afternoon. These are definitely going in the summer rotation.
Meditative is generous but I'll take it. Mine never make it past the first afternoon.
Figured out that if you freeze each layer for about 45 minutes before pouring the next one, you get those sharp color lines instead of everything bleeding together. Makes a big difference visually. I also went with coconut milk in the white layer instead of heavy cream and it set up firmer, which made unmolding way cleaner. These are going in the regular summer rotation.
Third batch since the weather warmed up and I think I finally nailed the layering. You have to wait for each layer to fully freeze before adding the next. First time I got impatient and the colors bled together (still tasted fine, just looked like tie-dye). These came out with clean stripes. Making another round this weekend because we demolished these in two days.
Tie-dye version is still good, just harder to explain to people. Clean stripes are so much more satisfying to pull out of the mold. Two days sounds about right.
My son grabbed one from the freezer before I could warn him they needed more time to set. Ate it down to the stick and asked when I'm making more. That kid has never once asked me to make more of anything sugar-free.
Down to the stick on a not-fully-set popsicle. Kid has taste. And 'asked when I'm making more' from someone who ignores sugar-free everything is the best review I've gotten on this recipe.
made a batch this weekend and they're so good. one thing: let each layer freeze all the way before pouring the next (I rushed it and my cherry and lime swirled together). that lime tartness keeps haunting me.
Rush it and you get pink swirl, not stripes. 45 minutes between layers minimum, surface has to look completely matte before you pour. That lime doesn't let go.
The flavoring extracts seemed like they'd just taste like candy perfume, but the cherry layer actually reads as cherry, not 'pink sweet.' I've made other keto popsicle versions that come out tasting like sweetened water with a faint hint of something, and this one holds up as three distinct layers you can actually tell apart. Getting that powdered sweetener ratio right in the base makes all the difference. Double batch going in the freezer this weekend before it gets hot.
'Pink sweet' is what every other keto popsicle tastes like. LorAnn is concentrated enough that a quarter teaspoon actually reads as cherry. Double batch before summer is the right call.
Brought a batch to my sister's backyard thing last Saturday and they were gone in twenty minutes. My sister waited until every popsicle was eaten before telling the group they were sugar-free. Twelve people including four kids with strong opinions about bomb pops, zero suspicion until that moment. I used coconut milk in the white layer because I had it open, and the texture came out cleaner, less heavy than cream in something frozen. The lime layer is sharp. That quarter teaspoon does more than you'd expect. Already planning a double batch before it actually gets hot out.
Kids with strong opinions about bomb pops and zero suspicion. That's the one. The lime goes sharp fast for such a small amount. Worth tasting the base before you freeze.
Made a double batch last weekend when the weather finally turned warm, and my son (the one who cross-examines me about every ingredient) watched the whole layering process and then told my neighbor's kid they were 'the real kind.' That cracked me up, because I was genuinely nervous about how the cherry extract would hold at that dilution. The three layers set up cleaner than I expected, especially the blue raspberry, which is usually the hardest artificial flavor to nail without tasting like cough syrup. I used coconut milk in the white layer instead of heavy cream and I think it helped the stripe stay distinct rather than bleeding into the red. Making another batch this week, probably doubling the red layer since my kids keep eating around the lime section and leaving little lime stubs on the popsicle sticks.
Coconut milk does keep the stripe tighter. I'd noticed that but never figured out why. My kids eat around the lime every time, so yeah, double the red.
Made these with coconut milk instead of heavy cream because I didn't have any on hand, and the white layer came out firmer than I expected. Cleaner separation too, which honestly surprised me for a first try at layered popsicles. The lime extract is pretty strong, so I cut it to about 1/8 teaspoon and that worked better for my taste. The thing I figured out is that each layer needs at least 45 minutes in the freezer before you pour the next one, otherwise they run together. First batch I rushed it and the red and white muddled at the bottom. Second batch looked like the real thing. Never made a frozen dessert from scratch before, so I'll take it.
Coconut milk sets firmer than cream. That's probably what gave you the clean separation on top of the freeze time. 1/8 teaspoon on the lime is where most people land.